how to draw a 3d banner
How to draw a banner - 3 ways to main any banner shape
Learn how to draw a banner with simple step-by-step instructions. iii dissimilar banners: a simple straight banner to get you started, a overnice wavy imprint for a better look and an ultimate double banner to show off all the tricks you lot might need for whatsoever banner shape.

Our outset banner is a really simple straight banner, made out of three rectangles - a perfect way to learn how to draw the banner folds without getting lost.
For the 2nd banner, we depict a similarly shaped ribbon but with some smooth wavy lines. The consequence is a softer and more interesting banner shape.
Our terminal banner is a double banner. Information technology will teach you how to join the 2 lines of text and fold the imprint and its ends to either side - the variations that volition teach you how to depict a banner of whatsoever shape
pencil
,
eraser
,
color pencils
drawing paper
or
sketch book
Love drawing? Never miss a tutorial!
How to depict a banner: an easy straight banner

Our first banner is really simple - made merely out of three rectangles and few extra straight lines. Information technology is the perfect start for learning how to describe the banner folds without getting lost in all the curves. The line shading gives the banner some depth and nicely suggests the folds in the ribbon.
How to depict a an easy directly banner: base sketch
Step 1 : Draw the base imprint rectangles

Start the banner drawing with a rectangle that is long enough for whatsoever message you intend to write into it. So add two shorter rectangles slightly offset on each side - these will be the folded banner ends. Here we are drawing the imprint folds lower than the main rectangle. If you lot desire your banner folded the other way round, merely move them upward.
Stride 2 : Depict the banner fold lines and cease cutouts
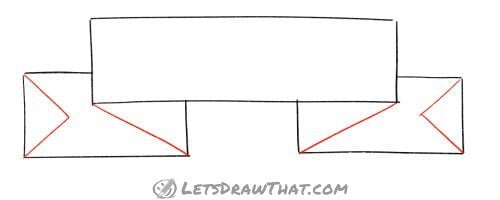
To make the folded banner ends connected to the main banner, join the outer corners of your chief rectangle with a elementary straight line to the inner corners of the smaller fold rectangles. Finally, add ii "Five" shaped cutouts to the imprint ends - one at each side. And that'south it - with just two steps we have the uncomplicated banner sketch done.
How to draw a an like shooting fish in a barrel straight imprint: outline
Footstep 1: Outline the imprint

Outlining the imprint is as simple as sketching it. Outline all the lines, just leaving out the outer edges that are cut out.
Stride two: Shade the banner

The concluding important detail, that volition make the banner pop out into 3D, is the shading. Hither nosotros desire to go on the banner as simple line art, that tin can exist added to enhance the hand lettering. So our shading is done with unproblematic individual lines. Shade the two ribbon fold triangles with spaced vertical lines. And so add some horizontal lines to the main banner edges - these suggest the tension folds in the ribbon. Notice the lines are shorter in the middle, and longer at the tiptop and bottom.
How to draw a banner: finished like shooting fish in a barrel direct banner cartoon
Finished directly banner drawing

And here is the completed simple banner drawing afterward nosotros have erased the sketch lines, with some lettering added. Made of three rectangles and drawn in just four steps, this indeed is the easiest style how to draw a banner.
Like this tutorial? Share information technology with others:
How to depict a imprint: a elementary wave banner

The second imprint is not much harder than the previous i. We are drawing a similarly shaped ribbon, just instead of the simplified square folds, we are drawing the folds with some smooth wavy lines. The result is a softer and more interesting imprint shape.
How to draw a moving ridge banner: base sketch
Step 1 : Depict the base of operations banner curve
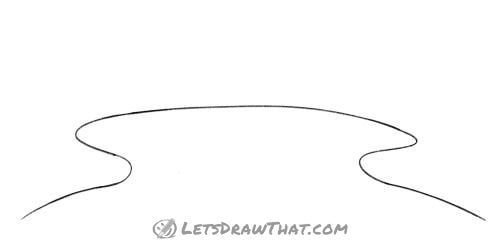
Let's draw the base bend for our wavy banner. It is made of two distinct parts: The first role is the long wide curvation at the superlative - again, draw it wide enough to fit your intended message. And then add together the folded ribbon ends. These are fabricated of ii mirrored "South" shaped curves, one on each terminate.
Pace ii : Add banner sides
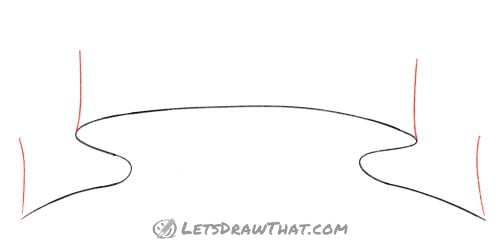
Next, add the sides of the banner - four short lines up from the base curve, all the same length, equally tall as yous want your ribbon to be. Add two lines at the ends of the line, and two more than at the top corner of the "S" curves, to the furthermost point where the line changes management. If you have a keen eye, you volition find that our lines are not completely straight, but slightly curved in, to go on the overall dynamic, wavy feel of the ribbon.
Footstep 3 : Depict the upper edges of the banner
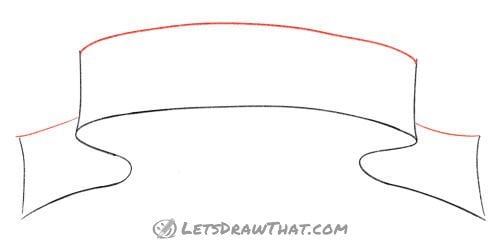
At present it is fourth dimension to describe the upper edges to close the wave banner shape. These are simple curves parallel to the contour of your baseline.
Pace 4 : Add the missing banner fold lines and cutouts at the end
The very last step to complete the wave banner drawing is to add together two more up edge lines at the inner folds - the two low corners of the "South" curves. An option to add some contrast to the smooth lines is again to depict the "V" cutouts at the ribbon ends (or leave your ribbon edges directly for a alter).
How to draw a banner: wave banner outline steps
Step 1: Outline the imprint

Like to the previous simple banner, outline all the lines, leaving out but the far edges that are cut out (if y'all take decided to sketch the cutouts, that is).
Step 2: Shade the imprint

The shading for the wavy banner is over again the same as for the unproblematic foursquare version above: Shade the two ribbon fold corners with spaced vertical lines. And so add some horizontal lines to the main banner to suggest the tension in the folds - shorter lines in the centre and longer at the pinnacle and lesser.
How to draw a imprint: finished wavy banner cartoon
Finished wavy banner drawing

And here is the completed wave banner drawing with the sketch lines erased and some lettering added. While adding the curvy corners is a slightly harder manner how to draw a banner, the event is more than dynamic and interesting. The smooth curves also brand the banner look more rustic and old-fashioned. This is the perfect banner to combine with the heart drawing or some flower drawings for your Valentine's twenty-four hours or Mother's day cards!
Like this tutorial? Share it with others:

How to describe a imprint: double imprint

The third banner is a double banner - you volition larn how to draw a banner with 2 lines of text. For some multifariousness and exercise, we bend the main text expanse up and each of the ribbon ends to a different side - ane upwardly and the other 1 down.
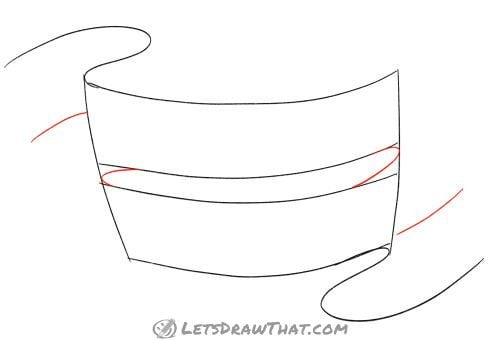
How to draw a double banner: base sketch
Step 1 : Depict the base imprint text areas

Star cartoon the double banner by sketching the two main text areas. This time the text will be aptitude up. Describe a rectangle with curved sides, every bit wide equally your text will be. Then split it into two parts of the same pinnacle, one for each line of the text, with a narrow space in between.
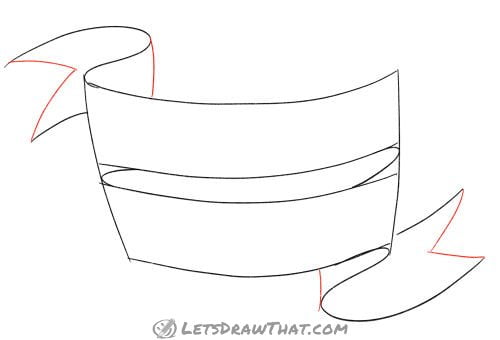
Step 2 : Depict the folded ribbon ends

Next, add the folded outer ribbon edges - only unproblematic "Due south" curves - one at the acme left corner, another at the lesser right.
Step 3 : Add the remaining ribbon edges
Draw the other edges for the ribbon ends - these but follow the other edge bend in parallel, at the same distance as the tiptop of your text fields (or the ribbon width). Then draw the subconscious folded edges betwixt the two text lines - these are just two "C" shaped curves that smoothly transition between the ii lines.
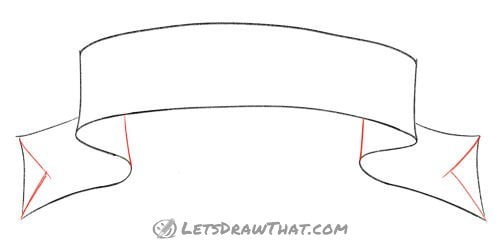
Step iv : Draw the end ribbon cutouts and fold the sides
The last few lines that consummate the folded ribbon banner shape are the vertical sides at the furthermost point of the "S" curves, where the line changes direction. And finally, the "5" shaped cutouts at each ribbon end. That is our imprint sketch complete.
How to depict a double imprint: outline steps
Stride i: Outline the upper banner line

Since the double imprint drawing is a bit more complex, nosotros volition outline the banner in several steps, so nosotros do not get lost. Start with drawing out the upper text area of the banner - the top "Due south" curve and the lower "J" shaped border that turns downwards to the next line. Notice we are not drawing the line all the way out to the terminate - that is considering we volition round off the abrupt corners after.
Step ii: Outline the lower imprint line

The lower text area is a mirror image of the upper 1 - the "J" curve at the top, and the "S" curve for the bottom border. Once again, do not depict all the way out to the corners.
Footstep 3: Shut the vertical sides of the banner

Now it is time to close off those corners! Describe the vertical ends of the ribbon on both sides for both text areas slightly curved out, and round off those precipitous corners.
Step iv: Outline the final ribbon edges

Complete the imprint shape by outlining the remaining sketch lines - the cut-out edges and the vertical lines for the folds.
Step v: Shade the imprint

Here comes the important shading role over again to bring out the shape and folds of the banner. Equally with the simple banners, hatch the small triangles in the "South" shaped end folds. And then use the same vertical hatch lines to shade the center part between the ii banner rows, where the ribbon returns from 1 line to the other.
How to draw a banner: finished double banner drawing
Finished double banner drawing

Here is the completed masterpiece - the finished double imprint drawing once we take erased the sketch lines and added some lettering. If you did not get lost in drawing the double banner, you are well on your fashion to knowing how to depict a banner of whatsoever shape - curved upward or down, with the ends flying either side likewise. And of course, yous can add more layers of text every bit well - just repeat the aforementioned transition between the lines every bit many times as you need.
Like this tutorial? Share it with others:
Love cartoon? Never miss a tutorial!
Go notified when there is a new tutorial published on Let'southward Draw That! (ii-iv times a month)
Cheque out the latest tutorials:
Similar this? Share the fun with others:

Source: https://letsdrawthat.com/how-to-draw-a-banner/
0 Response to "how to draw a 3d banner"
Post a Comment